集成单群聊 UIKit
大约 3 分钟
UIKit-React Native 集成文档
集成单群聊 UIKit
下面介绍如何集成单群聊 UIKit。
开发环境需求
- MacOS 12 或以上版本
- React-Native 0.71 或以上版本
- NodeJs 20.18 或以上版本
- iOS 平台:Xcode 15 或以上版本
- Android 平台:Android Studio 2022.3 或以上版本
开发者账号
有效的环信即时通讯 IM 开发者账号。
操作步骤
第一步 创建项目
如果已经有项目,则跳过此步。
- 创建项目
npx @react-native-community/cli@latest init --skip-install --version "0.83.2" simple_uikit_demo # 推荐创建稳定版本示例
- 初始化项目
yarn set version 4.9.1
yarn config set nodeLinker node-modules
yarn
第二步 集成 UIKit
yarn add react-native-chat-uikit
第三步 第三方依赖
添加 UIKit 必须的第三方依赖:
yarn add @react-native-async-storage/async-storage \
@react-native-camera-roll/camera-roll \
@react-native-clipboard/clipboard \
react-native-audio-recorder-player \
react-native-chat-sdk \
react-native-create-thumbnail \
react-native-device-info \
@react-native-documents/picker \
react-native-chat-uikit \
react-native-file-access \
react-native-gesture-handler \
react-native-image-picker \
react-native-safe-area-context \
react-native-video
提示
该第三方库 react-native-audio-recorder-player 已停止维护,但其所推荐的替代库目前仍存在较多问题。因此,建议继续使用该库,并将版本控制在 3.6.14 以下。
第四步 添加权限
添加必要的应用权限。
- iOS
更新 Info.plist 文件内容,增加需要的权限。
<dict>
	<key>NSCameraUsageDescription</key>
	<string></string>
	<key>NSMicrophoneUsageDescription</key>
	<string></string>
	<key>NSPhotoLibraryUsageDescription</key>
	<string></string>
</dict>
- Android
更新 AndroidManifest.xml 文件内容,增加需要的权限。
<manifest xmlns:android="http://schemas.android.com/apk/res/android">
    <uses-permission android:name="android.permission.INTERNET"/>
    <uses-permission android:name="android.permission.CAMERA" />
    <uses-permission android:name="android.permission.READ_EXTERNAL_STORAGE" />
    <uses-permission android:name="android.permission.WRITE_EXTERNAL_STORAGE" />
    <uses-permission android:name="android.permission.RECORD_AUDIO" />
</manifest>
第五步 添加代码
/* eslint-disable react-native/no-inline-styles */
/**
 * Sample React Native App
 * https://github.com/facebook/react-native
 *
 * @format
 */

import * as React from "react";
import { Pressable, SafeAreaView, Text, View } from "react-native";
import { GestureHandlerRootView } from "react-native-gesture-handler";
import {
  Container,
  ConversationDetail,
  TextInput,
  useChatContext,
} from "react-native-chat-uikit";

const appKey = "<your app key>";
const userId = "<current login id>";
const userPassword = "<current login password or token>";
const usePassword = true; // or false;
const peerId = "<chat peer id>";

function SendMessage() {
  const [page, setPage] = React.useState(0);
  const [_appKey, setAppKey] = React.useState(appKey);
  const [id, setId] = React.useState(userId);
  const [ps, setPs] = React.useState(userPassword);
  const [peer, setPeer] = React.useState(peerId);
  const im = useChatContext();

  if (page === 0) {
    return (
      // 登录页面
      <SafeAreaView style={{ flex: 1 }}>
        <TextInput
          placeholder="Please App Key."
          value={_appKey}
          onChangeText={setAppKey}
        />
        <TextInput
          placeholder="Please Login ID."
          value={id}
          onChangeText={setId}
        />
        <TextInput
          placeholder="Please Login token or password."
          value={ps}
          onChangeText={setPs}
        />
        <TextInput
          placeholder="Please peer ID."
          value={peer}
          onChangeText={setPeer}
        />
        <Pressable
          onPress={() => {
            im.login({
              userId: id,
              userToken: ps,
              usePassword: usePassword,
              result: (res) => {
                console.log("login result", res);
                if (res.isOk === true) {
                  setPage(1);
                }
              },
            });
          }}
        >
          <Text>{"Login"}</Text>
        </Pressable>
        <Pressable
          onPress={() => {
            im.logout({
              result: () => {},
            });
          }}
        >
          <Text>{"Logout"}</Text>
        </Pressable>
      </SafeAreaView>
    );
  } else if (page === 1) {
    // 聊天页面
    return (
      <SafeAreaView style={{ flex: 1 }}>
        <ConversationDetail
          convId={peer}
          convType={0}
          onBack={() => {
            setPage(0);
            im.logout({
              result: () => {},
            });
          }}
          type={"chat"}
        />
      </SafeAreaView>
    );
  } else {
    return <View />;
  }
}

export default function App(): React.JSX.Element {
  // 初始化 UIKit
  return (
    <GestureHandlerRootView style={{ flex: 1 }}>
      <Container options={{ appKey: appKey, autoLogin: false }}>
        <SendMessage />
      </Container>
    </GestureHandlerRootView>
  );
}
第六步 设置配置选项
在 环信控制台 获取 App Key 和用户 ID 和 token,然后填入配置选项:
- 在 应用概览 页面 获取 App Key。
- 创建用户,获取用户 ID 和用户 token。详见 创建用户文档。
const appKey = "<your app key>";
const userId = "<current login id>";
const userPassword = "<current login password or token>";
const usePassword = false; // or false;
const peerId = "<chat peer id>";
第七步 编译运行
- iOS
- 安装 pod 依赖:
cd ios && pod install && cd ..
- 运行项目:
yarn run ios
- Android
yarn run android
第八步 发送消息
点击 Login 按钮登录进入聊天页面,输入文本消息,然后发送,即可开始聊天。
| 登录 | 发送消息 |
|---|---|
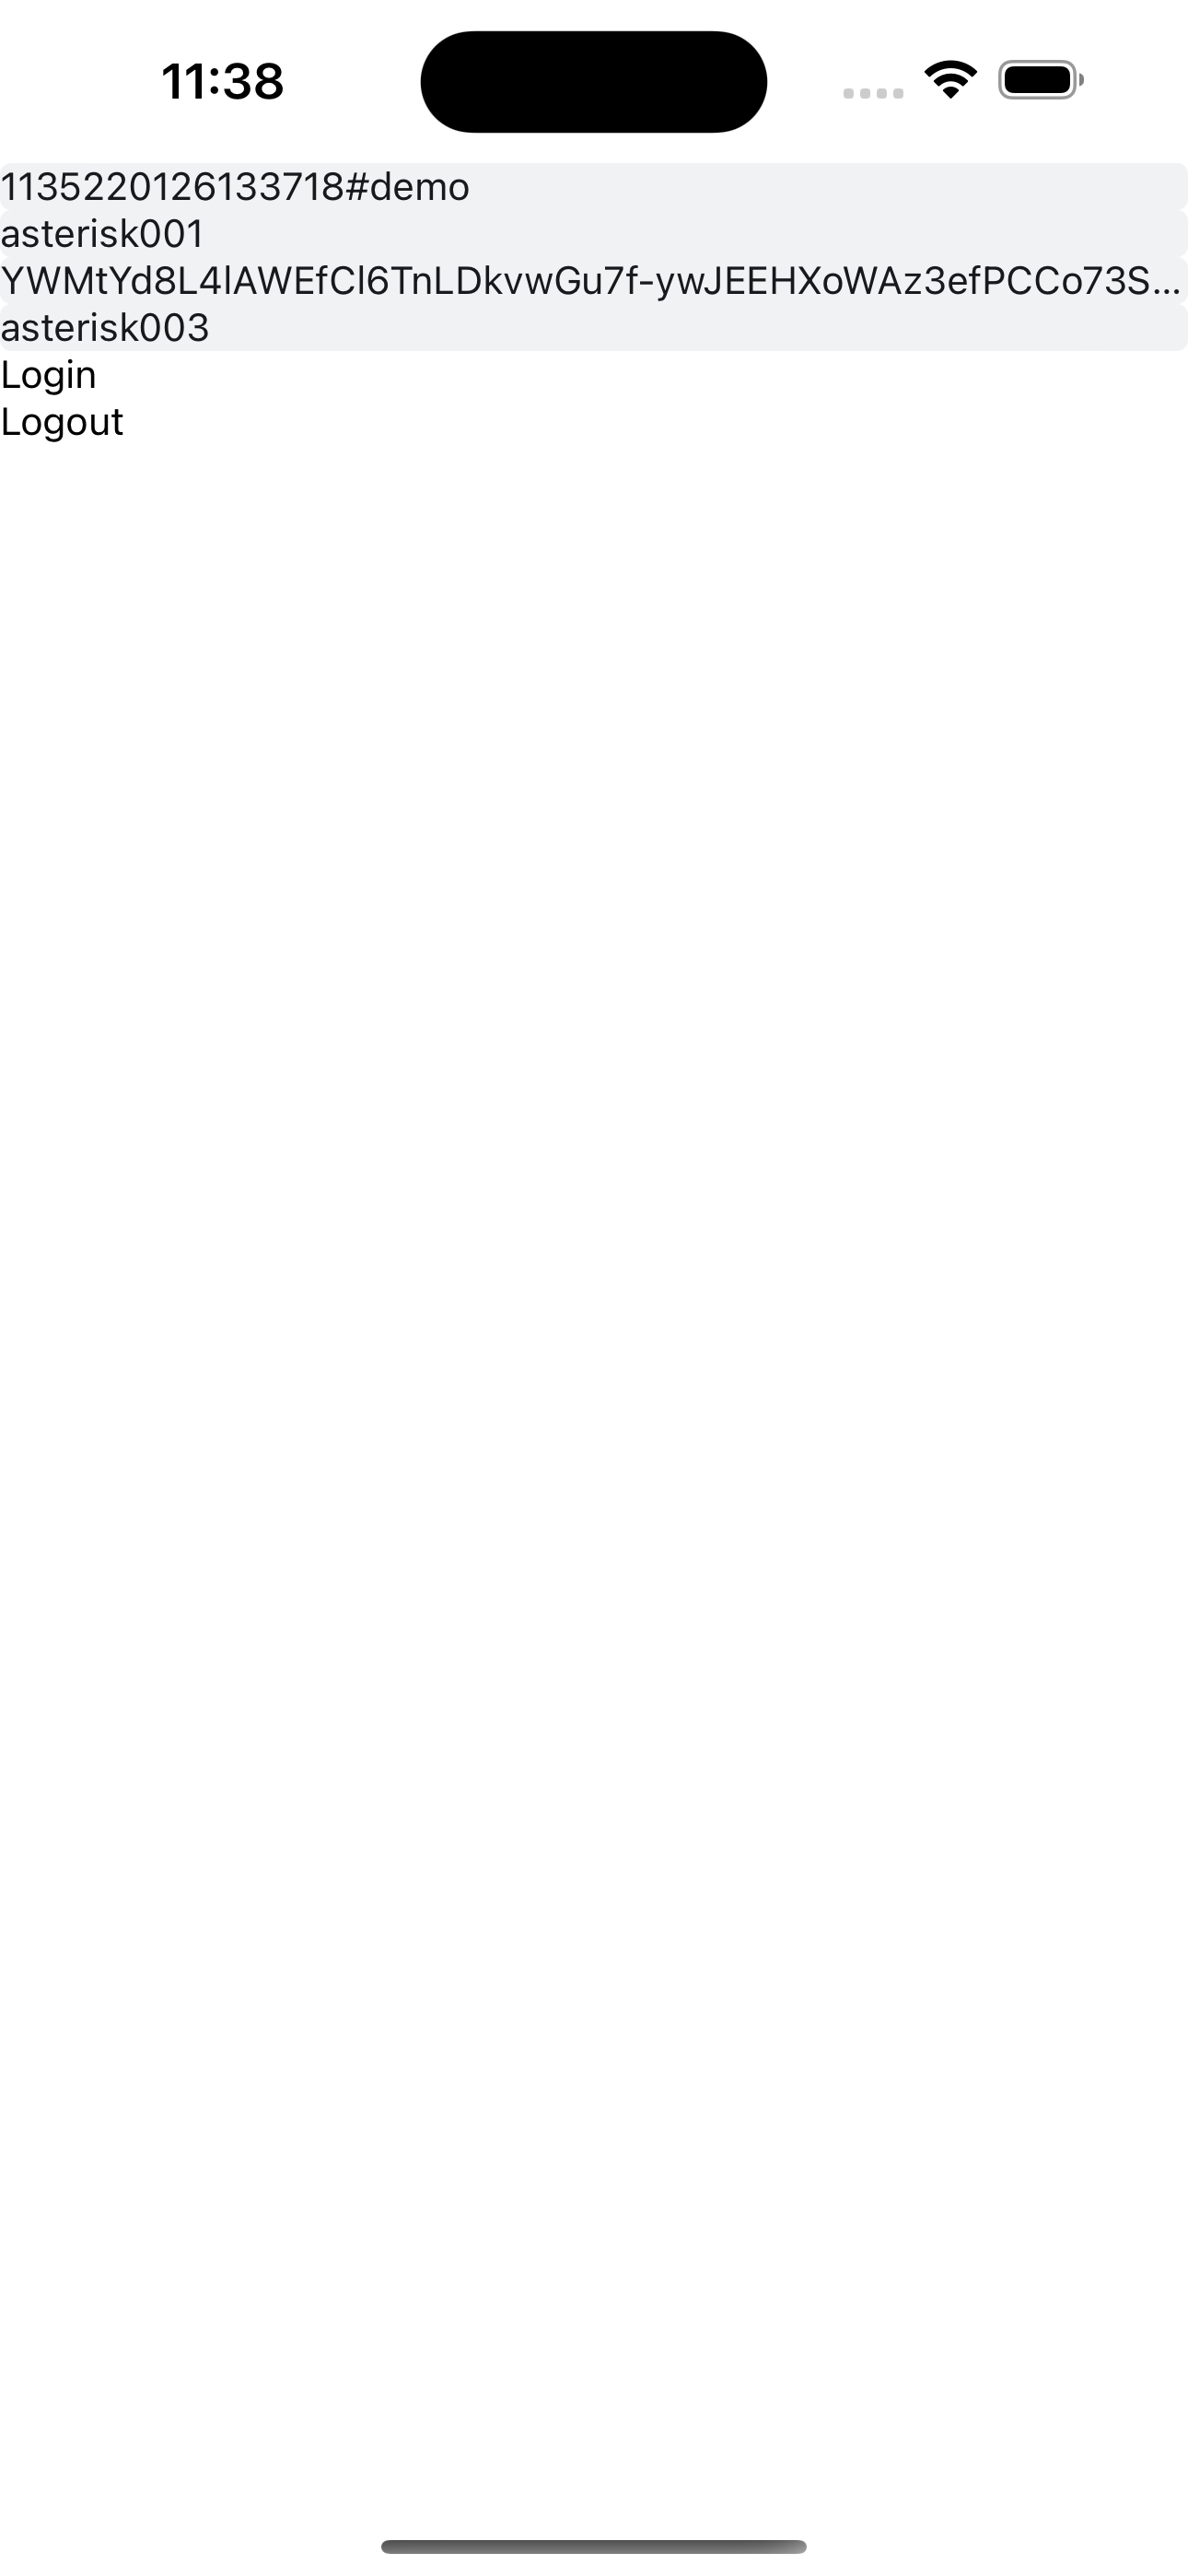 | 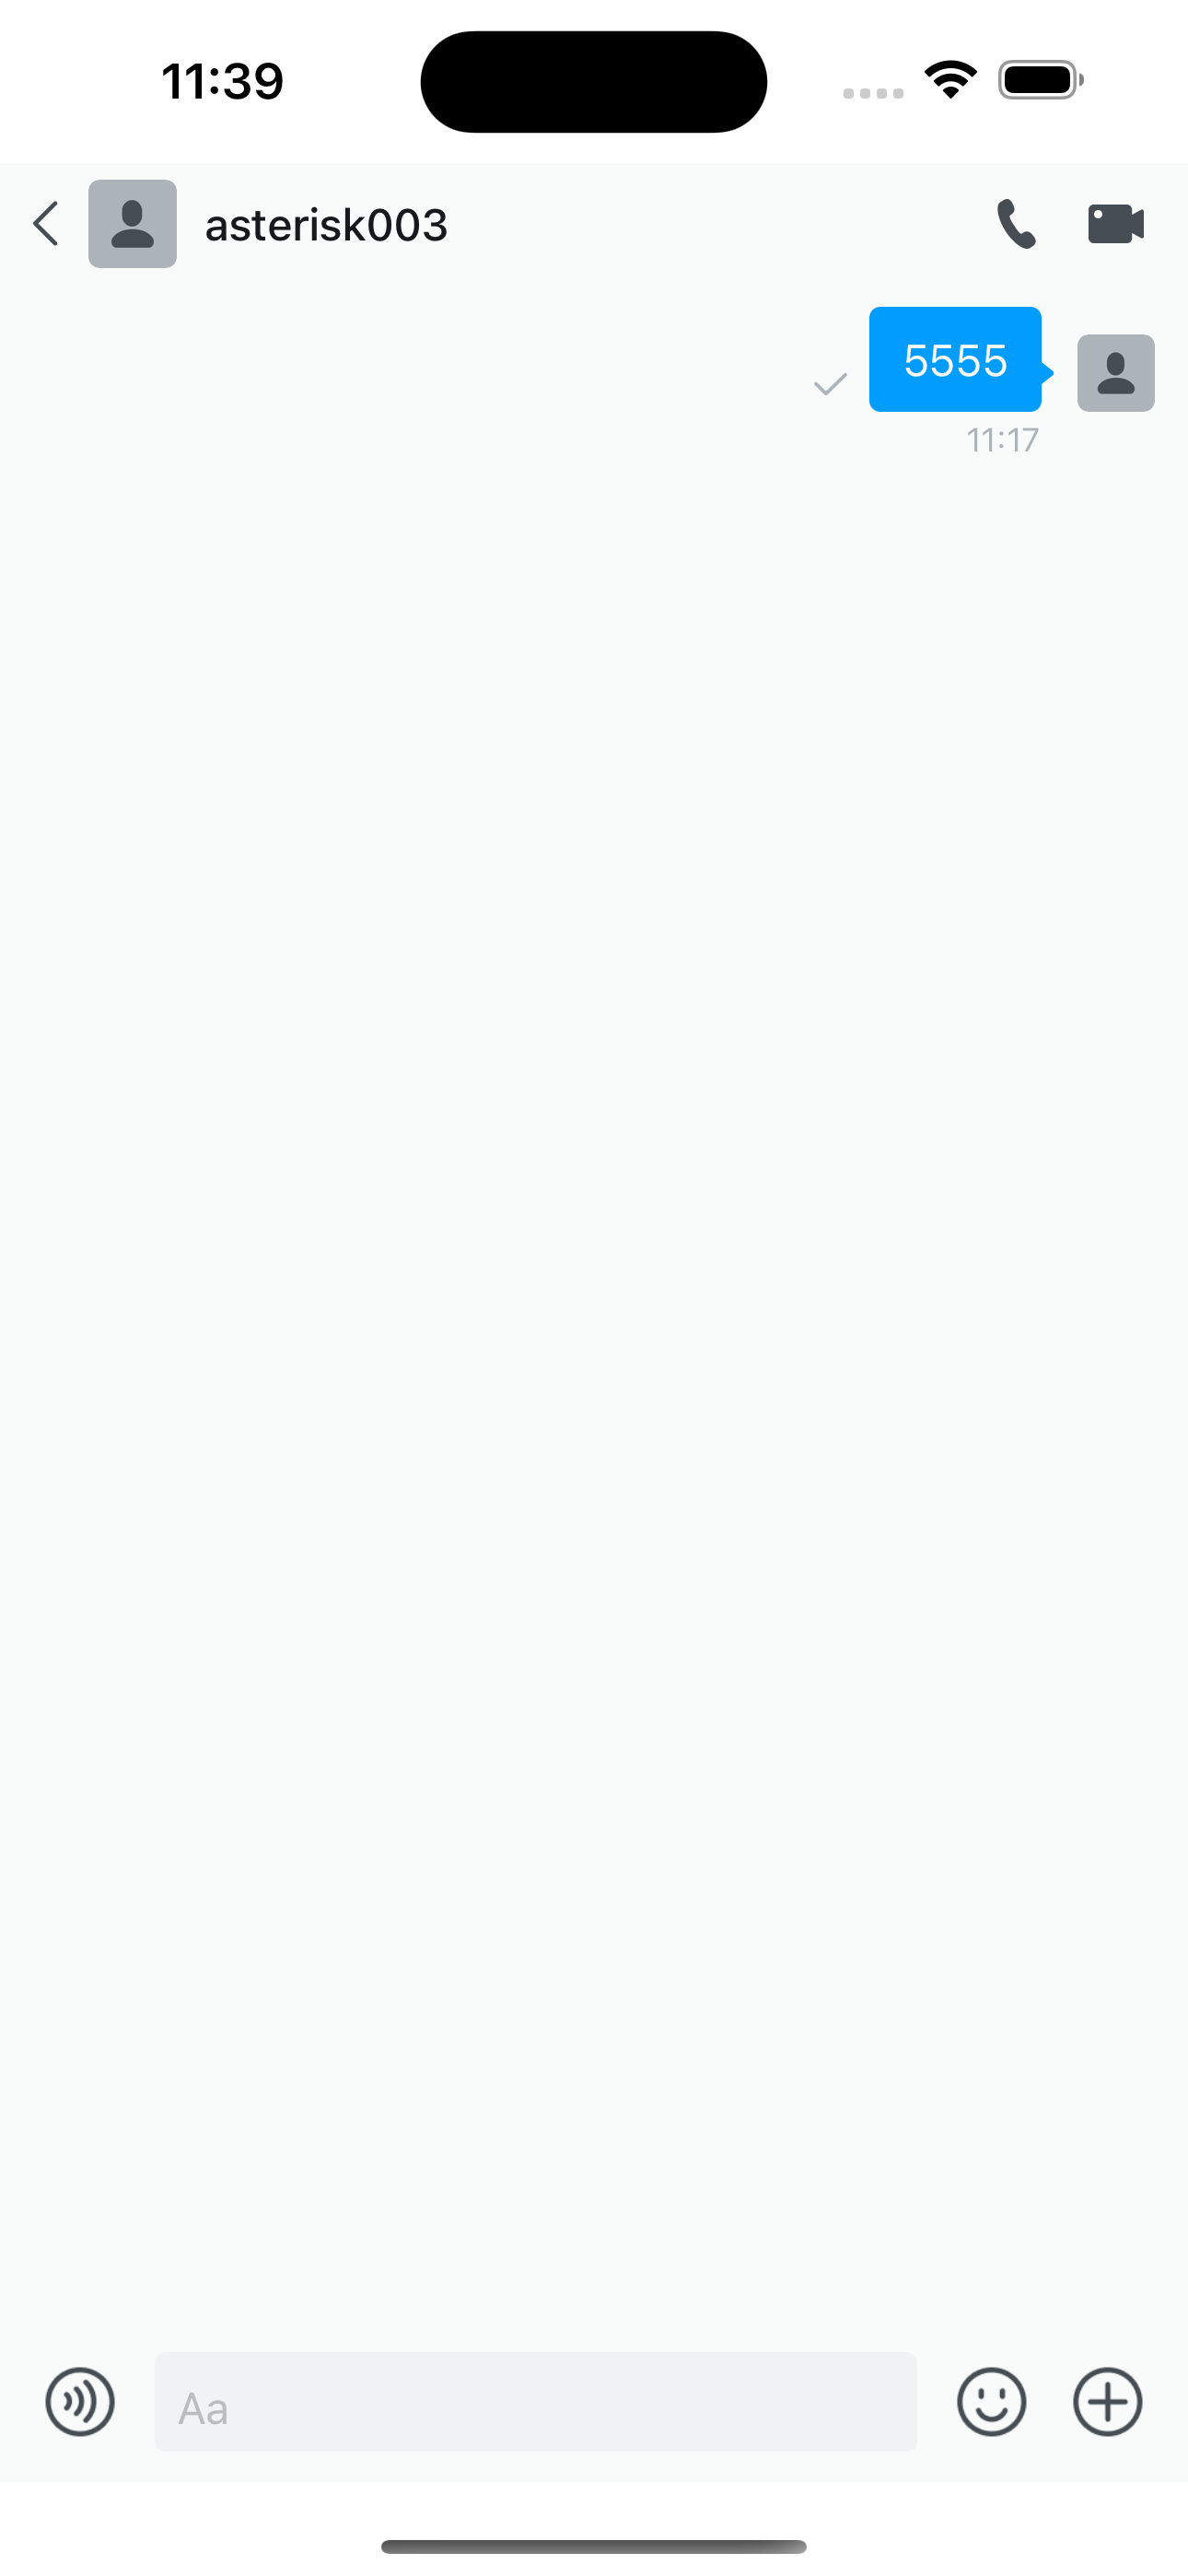 |
常见问题
详见 常见问题。