CallKit 集成指南
CallKit 集成指南
环信 CallKit 是一套基于环信即时通讯 IM(基于 IM 4.16.0 及以上)和声网 RTC 结合开发的音视频 UI 库。使用环信 CallKit 之前,你需要将其集成到你的应用中。如果用户要使用系统的 LiveCommunicationKit,建议设置环信即时通讯 IM 为自动登录。
开发环境要求
- Xcode 16.0 或以上版本
- 最低支持系统版本:iOS 15.0
- 已为你的项目设置有效的开发者签名
- CocoaPods v1.14.3 或以上版本
前提条件
在 环信控制台 进行如下操作:
集成步骤
步骤 1 添加依赖
你可以使用 CocoaPods 安装环信 CallKit 作为 Xcode 项目的依赖项。
CocoaPods 是 iOS 和 macOS 项目的依赖管理工具。它允许你轻松地将第三方库集成到您的项目中,并自动处理依赖关系。安装方法请自行询问 AI 或者搜索引擎。
方式一:通过 CocoaPods 远程安装
- 使用
pod init命令创建podfile文件,在podfile中添加如下依赖:
target 'YourTarget' do
  use_frameworks!

  pod 'EaseCallUIKit'
end

post_install do |installer|
  installer.pods_project.targets.each do |target|
    target.build_configurations.each do |config|
      config.build_settings['IPHONEOS_DEPLOYMENT_TARGET'] = '15.0'
    end
  end
end
- 运行 cd 命令到终端下
podfile所在文件夹目录执行以下命令:
pod install
方式二:本地源码集成
如需基于源码进行调试,可将 CallKit 源码克隆到本地,并修改 Podfile 中的依赖路径。
- 克隆源码:
- GitHub 项目
git clone https://github.com/easemob/easemob-callkit-iOS.git
- Gitee 项目
git clone https://gitee.com/easemob-code/easemob-callkit-iOS.git
- 修改
Podfile中的依赖项:
pod 'EaseCallUIKit', :path => '../../easemob-callkit-iOS/'
../../easemob-callkit-iOS/ 为克隆到本地后的相对路径,需根据实际目录结构调整。
步骤 2 初始化 CallKit
CallKit 初始化包括如下步骤:
- 初始化环信环信即时通讯 IM SDK。CallKit 基于即时通讯 IM 作为信令通道,因此需先初始化 IM SDK。
- 填入你的应用的 App Key。
- 设置即时通讯 IM SDK 的
EMOptions/ChatSDKOptions类中的一些选项。 - 如果用户要使用系统的 LiveCommunicationKit,建议设置环信即时通讯 IM 为自动登录
isAutoLogin为true。
- 初始化 CallKit。 (可选)开启 VoIP 和画中画功能。
在整个应用生命周期中,初始化一次即可。
- 已集成 IM SDK,初始化 CallKit 的代码示例如下:
    //已经集成了环信 IM SDK 即已经 import HyphenateChat
    private func setupCallKit() {
        let options = EMOptions(appkey: appKey)
        #if DEBUG
        options.apnsCertName = "Your_APNS_Developer"
        options.pushKitCertName = "YourVoipDev"
        #else
        options.apnsCertName = "Your_APNS_Product"
        options.pushKitCertName = "YourVoipPro"
        #endif
        EMClient.shared().initializeSDK(with: options)
        //初始化环信CallKit
        let config = EaseCallUIKit.CallKitConfig()
        config.enableVOIP = true//开启voip功能后会自动开启LiveCommunicationKit,需要在develop.apple.com申请证书时勾选。
        config.enablePIPOn1V1VideoScene = true//开启画中画,同时需要开启应用后台摄像头采集权限。。
        CallKitManager.shared.setup(config)
    }
- 未集成 IM SDK,初始化 CallKit 的代码示例如下:
    //没有集成环信 IM SDK,只想使用 CallKit
    private func setupCallKit() {
        let options = ChatSDKOptions(appkey: appKey)
        #if DEBUG
        options.apnsCertName = "Your_APNS_Developer"
        options.pushKitCertName = "YourVoipDev"
        #else
        options.apnsCertName = "Your_APNS_Product"
        options.pushKitCertName = "YourVoipPro"
        #endif
        ChatClient.shared().initializeSDK(with: options)
        //初始化环信 CallKit
        let config = EaseCallUIKit.CallKitConfig()
        config.enableVOIP = true//开启voip功能后会自动开启LiveCommunicationKit,需要在develop.apple.com申请证书时勾选
        config.enablePIPOn1V1VideoScene = true//开启画中画,同时需要开启应用后台摄像头采集权限,详见[PictureInPicture.md](./PictureInPicture.md)。
        CallKitManager.shared.setup(config)
    }
步骤 3 配置监听器
你可以调用下面方法来监听 CallKit 中用户相关状态变更的事件和错误。
CallKitManager.shared.addListener(self)//添加监听,均为可选方法
以下是监听事件的示例代码:
extension MainViewController: CallServiceListener {
    // 通话错误
    func didOccurError(error: CallError) {
        DispatchQueue.main.async {
            self.showToast(toast: "Occur error:\(error.errorMessage) on module:\(error.module.rawValue)")
        }
        switch error { //Swift error handler
        case .im(.invalidURL):
            print("Invalid URL")
        case .rtc(.invalidToken):
            print("Invalid Token")
        case .business(.state):
            print("State error")
        case .business(.param):
            print("Param error")
        default:
            // 注意这里要通过 error.error.message 访问
            print("Other error: \(error.error.message)")
        }
//        switch error.module {//OC error handler
//        case .im:
//            switch error.getIMError() {
//            case .invalidURL:
//                print("")
//            default:
//                break
//            }
//        case .rtc:
//            switch error.getRTCError() {
//            case .invalidToken:
//                print("")
//            default:
//                break
//            }
//        case .business:
//            switch error.getCallBusinessError() {
//            case .state:
//                print("")
//            case .param:
//                print("")
//            case .signaling:
//                print("")
//            default:
//                break
//            }
//        default:
//            break
//        }
    }
   // 通话结束
    func didUpdateCallEndReason(reason: CallEndReason, info: CallInfo) {
        if let messageId = info.inviteMessageId {
            NotificationCenter.default.post(name: Notification.Name("didUpdateCallEndReason"), object: messageId)
        }

    }
    // 远端用户加入
    func remoteUserDidJoined(userId: String, uid: UInt, channelName: String, type: CallType) {

    }
    // 远端用户离开
    func remoteUserDidLeft(userId: String, uid: UInt, channelName: String, type: CallType) {

    }
    // RTC 引擎创建(可用于私有化部署配置)
    func onRtcEngineCreated(engine: AgoraRtcEngineKit?) {

    }

}
通话结束原因 CallEndReason 如下表所示:
| 原因 | 说明 |
|---|---|
CallEndReasonHangup | 正常挂断 |
CallEndReasonCancel | 本地用户取消通话 |
CallEndReasonRemoteCancel | 对方取消通话 |
CallEndReasonRefuse | 本地用户拒绝接听 |
CallEndReasonRemoteRefuse | 对方拒绝接听 |
CallEndReasonBusy | 忙线中 |
CallEndReasonNoResponse | 本地用户无响应 |
CallEndReasonRemoteNoResponse | 对方无响应 |
CallEndReasonHandleOnOtherDevice | 在其他设备接听 |
CallEndReasonRemoteDrop | 通话中断 |
步骤 4 登录 IM
调用即时通讯 IM SDK 的 login 方法传入用户 ID 和 Token 登录 IM。
在生产环境中,为了安全考虑,你需要在你的应用服务器集成 获取 App Token API 和 获取用户 Token API 实现获取 Token 的业务逻辑,使你的用户从你的应用服务器获取 Token。
            ChatClient.shared().login(withUsername: userId, token: token) { [weak self] userId,error  in
            if let error = error {
                self?.showCallToast(toast: "Login failed: \(error.errorDescription ?? "")")
            } else {
                self?.showCallToast(toast: "Login successful")
//if !userId.isEmpty { //如有需要透传头像昵称请打开
//    let profile = CallUserProfile()
//    profile.id = userId
//    profile.avatarURL = "https://xxxxx"
//    profile.nickname = "\(userId)昵称"
//    CallKitManager.shared.currentUserInfo = profile
//}
                self?.userIdField.isHidden = true
                self?.tokenField.isHidden = true
                self?.loginButton.isHidden = true
            }
        }
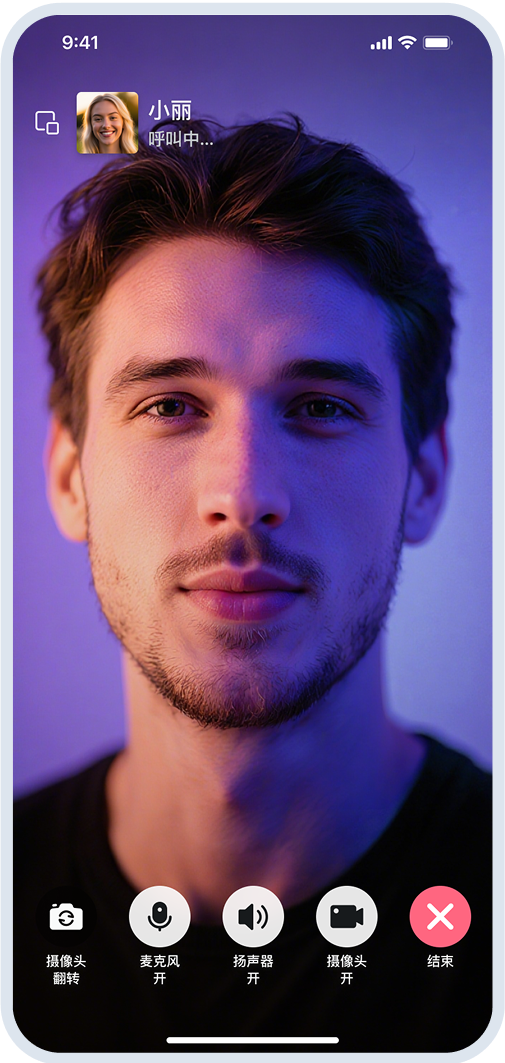
步骤 5 发起通话
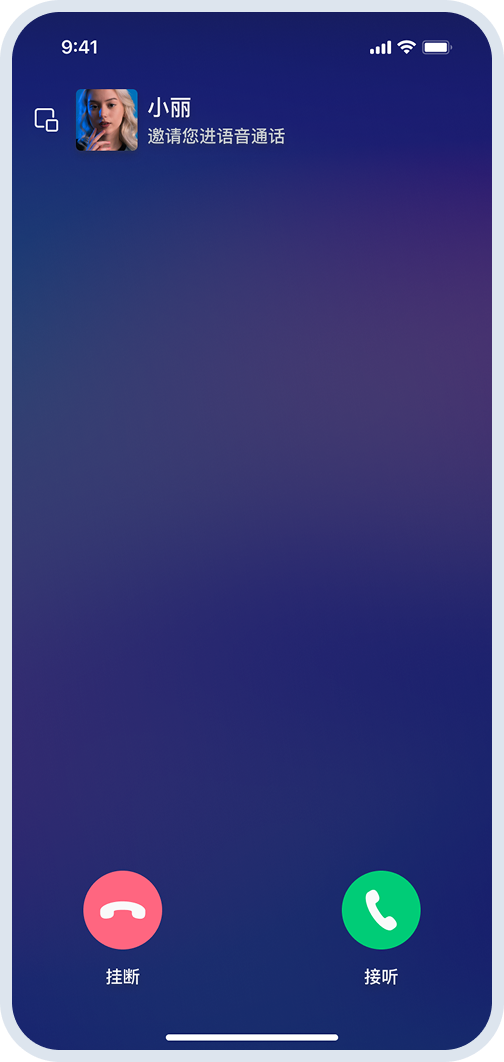
发起一对一通话
你可以使用 call 方法发起一对一通话,callType 设置为 singleVideo 为视频通话,singleAudio 为音频通话。
@IBAction func callAction(_ sender: Any) {
        self.view.endEditing(true)
        guard let input = inputField.text?.trimmingCharacters(in: .whitespacesAndNewlines), !input.isEmpty else {
            return
        }
            CallKitManager.shared.call(with: input, type: self.callType)
    }
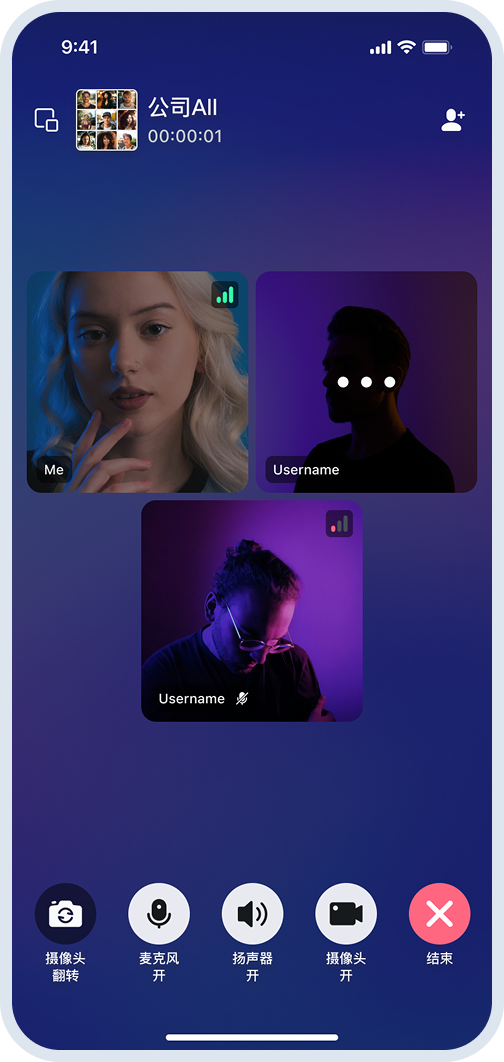
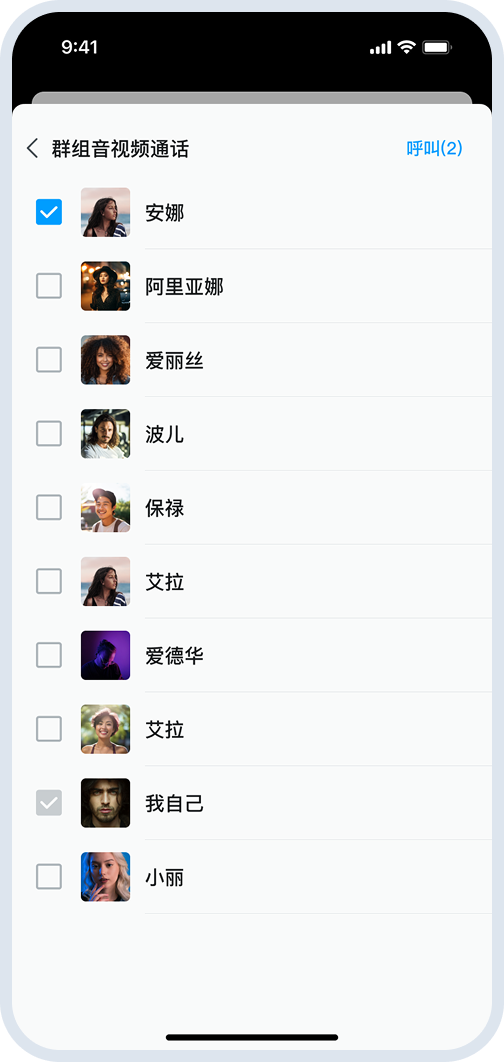
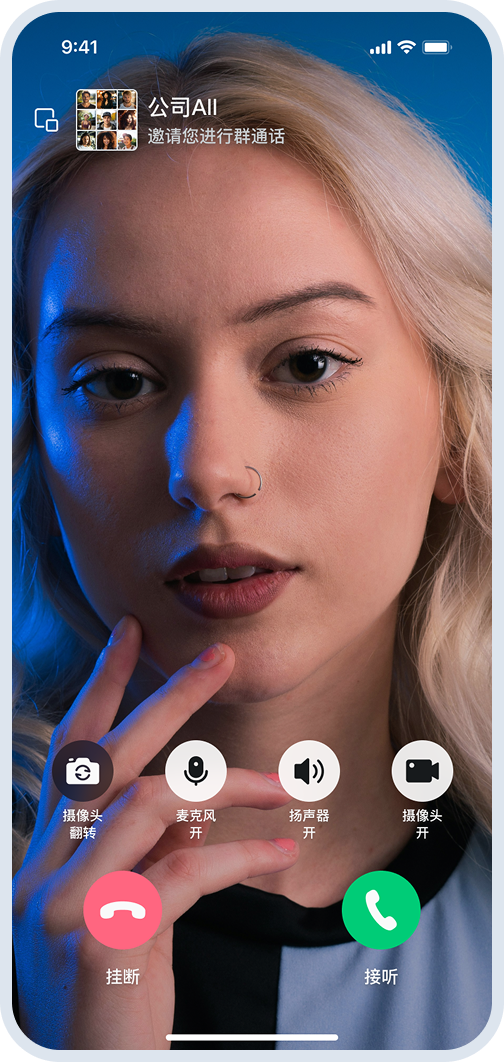
发起群组通话
- 创建群组:要发起群组通话,你需要首先创建群组,在群组中添加用户,详见 环信控制台文档。
- 发起群组通话:指定群组 ID 后,CallKit 会自动拉起群成员选择界面,界面显示群组中的所有成员(群主、管理员、普通成员),用户可以选择要邀请的成员,选中人数会实时显示。为了保证通话质量和性能,CallKit 限制群组通话最多支持 16 人 同时参与(包括发起者)。若选择的成员数量超过 16 人时,系统会自动提示 “人数超出最大限制16人” 并阻止发起通话。
- 通话中邀请他人:群组通话中,当前用户可以点击通话界面右上角的邀请按钮向其他用户发起邀请。
@IBAction func callAction(_ sender: Any) {
        self.view.endEditing(true)
        guard let input = inputField.text?.trimmingCharacters(in: .whitespacesAndNewlines), !input.isEmpty else {
            self.showCallToast(toast: "Please enter a valid username or group id")
            return
        }
            CallKitManager.shared.groupCall(groupId: input)
    }
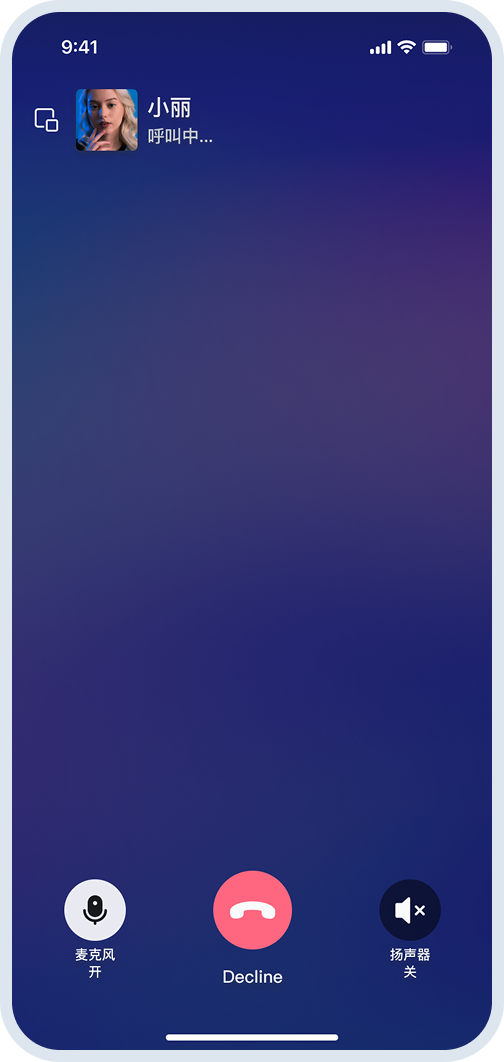
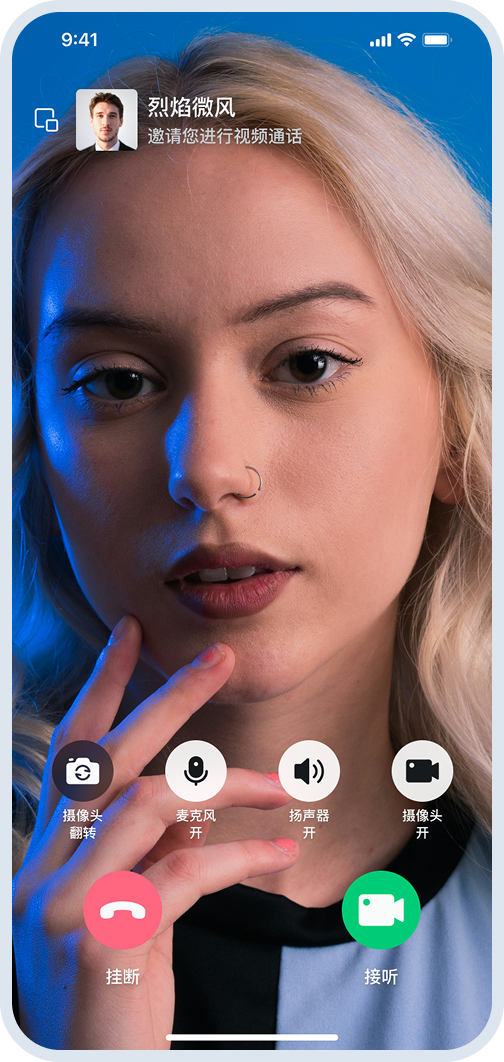
步骤 6 接听通话
当接收到通话邀请时,CallKit 会自动触发 onReceivedCall 回调:
- 弹出通话邀请界面。
- 播放来电铃声。
- 显示通话邀请通知(当 App 在后台时)。
被叫用户可选择接听、拒绝或挂断通话。
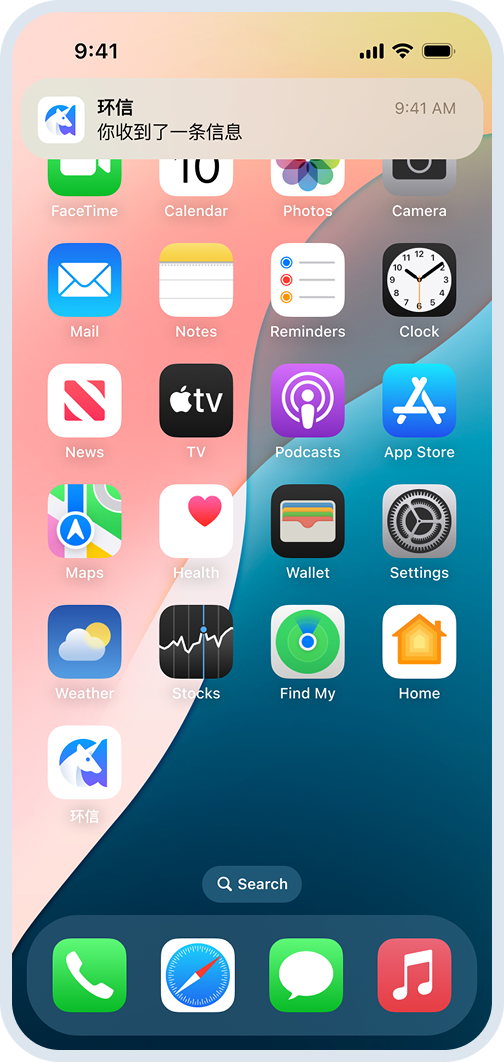
步骤 7 离线推送
为保证被叫用户 App 在离线时也能收到通话请求,用户需开启离线推送。关于如何开启离线推送,请参见 开启 APNs 推送。开启离线推送后,用户在离线情况下收到呼叫请求时,其手机通知页面会弹出一条通知消息,用户点击该消息可唤醒 App 并进入振铃弹窗。
关于离线推送场景方案,请参见 离线推送文档。
进阶用法
用户信息
默认情况下,音视频通话时,对于用户信息,CallKit 会显示默认头像和用户 ID;对于群信息,CallKit 会根据群组 ID 从 SDK 中拉取群信息来对应显示群组名称和群头像。
如果要在一对一通话界面显示自定义用户头像和昵称,群聊通话显示自定义群头像和群名称,你可以通过 profileProvider 实现自定义用户信息。
        CallKitManager.shared.profileProvider = self//Swift
        //CallKitManager.shared.profileProviderOC = self//OC 与上面profileProvider二者只能设置一个
        CallKitManager.shared.addListener(self)//添加监听,均为可选方法

//MARK: - CallUserProfileProvider
//For example using conversations controller,as follows.
extension ViewController: CallUserProfileProvider {
    func fetchUserProfiles(profileIds: [String]) async -> [any CallProfileProtocol] {
        return await withTaskGroup(of: [EaseCallUIKit.CallProfileProtocol].self, returning: [EaseCallUIKit.CallProfileProtocol].self) { group in
            var resultProfiles: [EaseCallUIKit.CallProfileProtocol] = []
            group.addTask {
                var resultProfiles: [EaseCallUIKit.CallProfileProtocol] = []
                let result = await self.requestUserInfos(profileIds: profileIds)
                if let infos = result {
                    resultProfiles.append(contentsOf: infos)
                }
                return resultProfiles
            }
            //Await all task were executed.Return values.
            for await result in group {
                resultProfiles.append(contentsOf: result)
            }
            return resultProfiles
        }
    }

    func fetchGroupProfiles(profileIds: [String]) async -> [any CallProfileProtocol] {
        return await withTaskGroup(of: [EaseCallUIKit.CallProfileProtocol].self, returning: [EaseCallUIKit.CallProfileProtocol].self) { group in
            var resultProfiles: [EaseCallUIKit.CallProfileProtocol] = []
            group.addTask {
                var resultProfiles: [EaseCallUIKit.CallProfileProtocol] = []
                let result = await self.requestGroupsInfo(groupIds: profileIds)
                if let infos = result {
                    resultProfiles.append(contentsOf: infos)
                }
                return resultProfiles
            }
            //Await all task were executed.Return values.
            for await result in group {
                resultProfiles.append(contentsOf: result)
            }
            return resultProfiles
        }
    }

    private func requestUserInfos(profileIds: [String]) async -> [CallProfileProtocol]? {
        var unknownIds = [String]()
        var resultProfiles = [CallProfileProtocol]()
        for profileId in profileIds {
            if let profile = CallKitManager.shared.usersCache[profileId] {
                resultProfiles.append(profile)
            } else {
                unknownIds.append(profileId)
            }
        }
        if unknownIds.isEmpty {
            return resultProfiles
        }
        let result = await ChatClient.shared().userInfoManager?.fetchUserInfo(byId: unknownIds)
        if result?.1 == nil,let infoMap = result?.0 {
            for (userId,info) in infoMap {
                let profile = CallUserProfile()
                let nickname = info.nickname ?? ""
                profile.id = userId
                profile.nickname = nickname
                profile.avatarURL = info.avatarUrl ?? ""

            }
            return resultProfiles
        }
        return []
    }

    private func requestGroupsInfo(groupIds: [String]) async -> [CallProfileProtocol]? {
        var resultProfiles = [CallProfileProtocol]()
        let groups = ChatClient.shared().groupManager?.getJoinedGroups() ?? []
        for groupId in groupIds {
            if let group = groups.first(where: { $0.groupId == groupId }) {
                let profile = CallUserProfile()
                profile.id = groupId
                profile.nickname = group.groupName
                profile.avatarURL = group.settings.ext
                resultProfiles.append(profile)
            }

        }
        return resultProfiles
    }
}
自定义视频分辨率
环信 CallKit 中默认设置的分辨率为 1280x720。网络连接不稳定时,声网 RTC SDK 会主动降低分辨率或帧率。
若要修改远端视频在本地显示的分辨率,可以在创建声网 RTC 引擎时在 onRtcEngineCreated 中进行配置:
func onRtcEngineCreated(engine: AgoraRtcEngineKit?) {
        let configuration = AgoraVideoEncoderConfiguration()
        configuration.orientationMode = .fixedPortrait
        configuration.dimensions = CGSize(width: 1280, height: 720)
        configuration.frameRate = .fps30
        engine?.setVideoEncoderConfiguration(configuration)
    }
更多其他配置可以参考 声网 RTC 文档。
常见问题
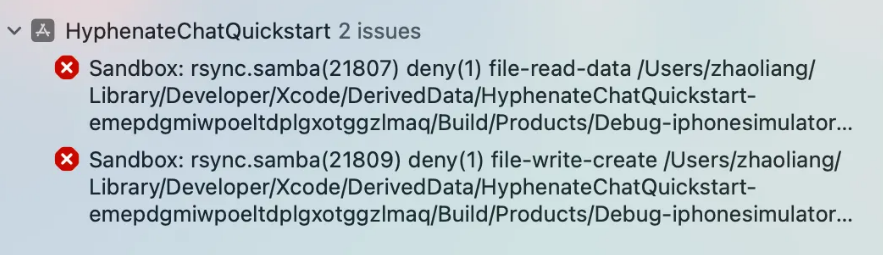
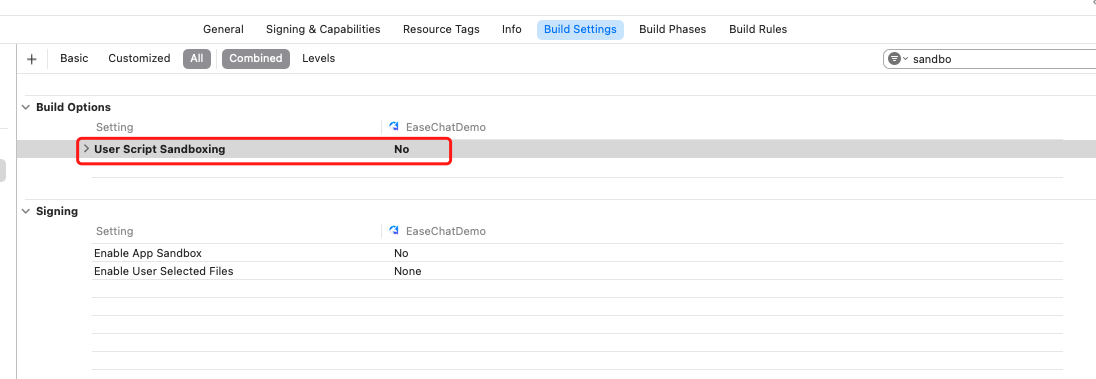
- 当你使用 Xcode 15 创建新工程时,编译时若出现 Sandbox: rsync.samba(47334) deny(1) file-write-create... 报错,你需要在 Target > Build Settings 中查找 User Script Sandboxing 选项,设置为 NO。
- 如果
pod install失败报错 RuntimeErrorPBXGroupattempted to initialize an object with unknown ISAPBXFileSystemSynchronizedRootGroupfrom attributes:{"isa"=>"PBXFileSystemSynchronizedRootGroup",请尝试将 pod 版本升级为 1.14.3。Xcode 16 及其以下版本打开会报错 Adjust the project format using a compatible version of Xcode to allow it to be opened by this version of Xcode.。